【Python】Flask入门旧文
介绍
对于springboot+vue、asp.net还是其他一些技术,我们实现网页都需要较长的学习时间,因此,为了快速开发,满足需求,我参考Python的Flask编写了这篇文章。
我使用的是flask+mysql的web网页集成开发。
参考文献如下:
Flask官方文档
既然介绍说完了,那就开始吧。
准备工作
在学习Flask之前,你需要具备Python和Html的基本知识,如果没有这方面的知识,可以先去学习一下再回到本文章


    Python的本地环境建议3.9.0以上版本,对于IDE工具,你可以使用PyCharm、VsCode、VisualStudio
安装Flask
pip install flask安装成功后就可以正式写代码了
一、你的第一个Flask应用
初始化项目
我使用的是PyCharm,当然你也可以选择其他IDE工具
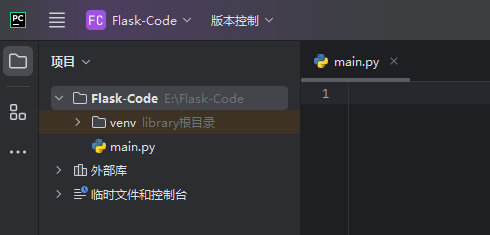
新建一个项目,然后创建一个基于本地python解释器的虚拟环境(防止污染本地环境)
编写代码
在main.py中编写以下代码,这样你就成功拥有了第一个Flask应用
from flask import Flask

app = Flask(__name__)

@app.route('/')
def hello():
    return 'Welcome to My Watchlist!'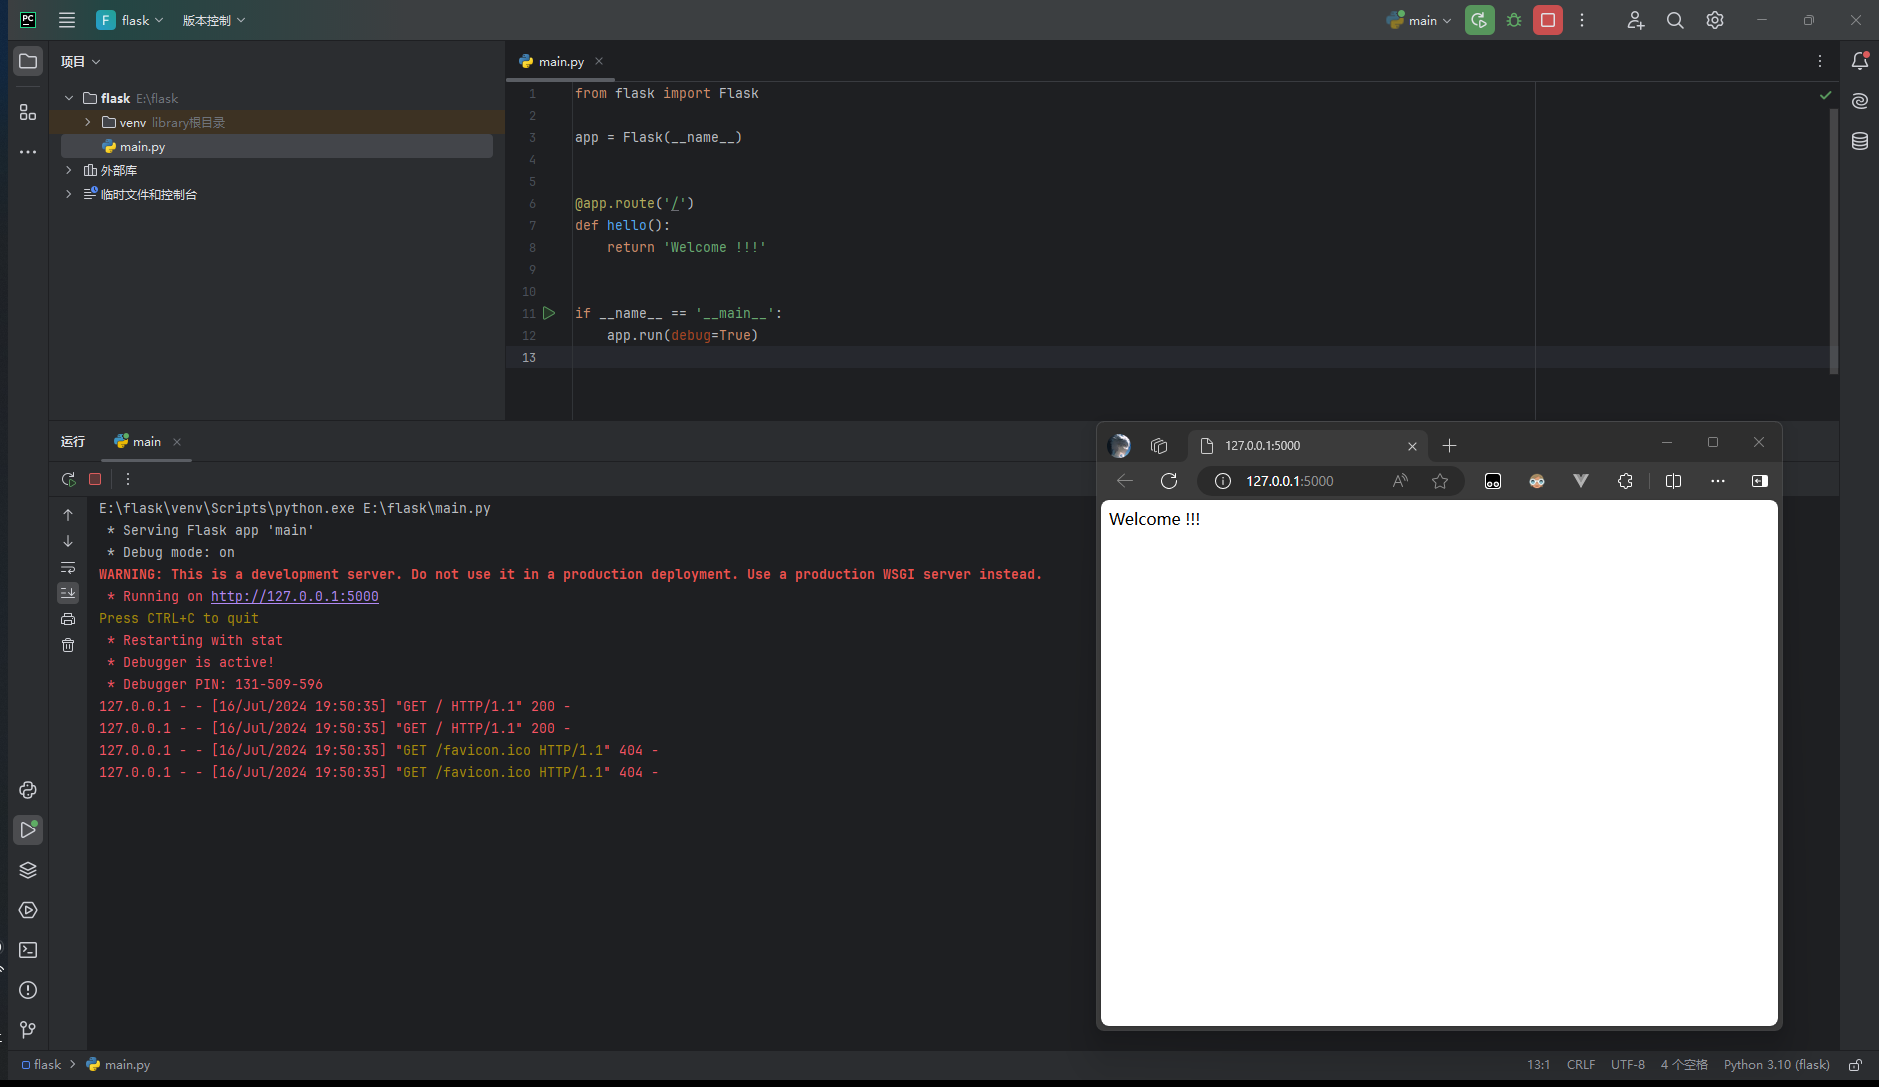
代码分析
如上面所见,我们成功初始化了一个flask项目,那么我们都做了什么呢?
from flask import Flask
app = Flask(__name__) 我们导入了flask库,实例化了这个类@app.route('/')
def hello():
return 'Welcome !!!' 我们创建了一个函数,在这个函数前面,我们使用了@app.route('/')装饰器,它将我们导向了对应的url
我们可以在这里做一些数据的处理,然后你就可以启动服务后访问到它
对于函数名,我们可以自由定义此处函数的return值可以被html解析成html,也可以是其他数据。
装饰器的一些使用原则
关于@app.route(‘/‘)URL规则
1.route内部的url都可以运行在部署的端口上,其编写规则是以斜线 /作为开头。
@app.route('/login')
def hello():
    return 'Welcome !!!'
2.对于一个函数,可以附加多个装饰器@app.route(‘/‘)。
@app.route('/')
@app.route('/login')
@app.route('/admin')
def login():
    return open(html_path+"login.html", "r", encoding="utf-8").read()
3.对于@app.route(‘/‘),我们还可以定义变量。
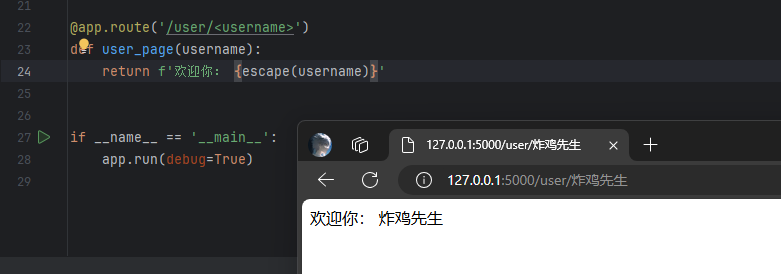
@app.route('/user/')
def user_page(username):
    return '欢迎你' + username
用户输入的数据会包含恶意代码,所以不能直接作为响应返回,需要使用 MarkupSafe(Flask 的依赖之一)提供的 escape() 函数对 name 变量进行转义处理,比如把 `‘)
def user_page(username):
return f’User: {escape(username)}’
### 视图函数的一些技巧
我们可以通过url查看使用哪个函数
作为代表某个路由的端点(endpoint),同时用来生成视图函数对应的 URL。
对于程序内的 URL,Flask 提供了一个 `url_for` 函数来生成 URL,它接受的第一个参数就是端点值,默认为视图函数的名称
```python
from flask import url_for
@app.route('/test')
def test_url_for():
# 下面是一些调用示例(请访问 http://localhost:5000/test 后在命令行窗口查看输出的 URL):
print(url_for('login')) # 生成 login 视图函数对应的 URL,将会输出:/admin
# 注意下面两个调用是如何生成包含 URL 变量的 URL 的
print(url_for('user_page', username='greyli')) # 输出:/user/greyli
print(url_for('user_page', username='peter')) # 输出:/user/peter
print(url_for('test_url_for')) # 输出:/test
# 下面这个调用传入了多余的关键字参数,它们会被作为查询字符串附加到 URL 后面。
print(url_for('test_url_for', num=2)) # 输出:/test?num=2
return 'Test page'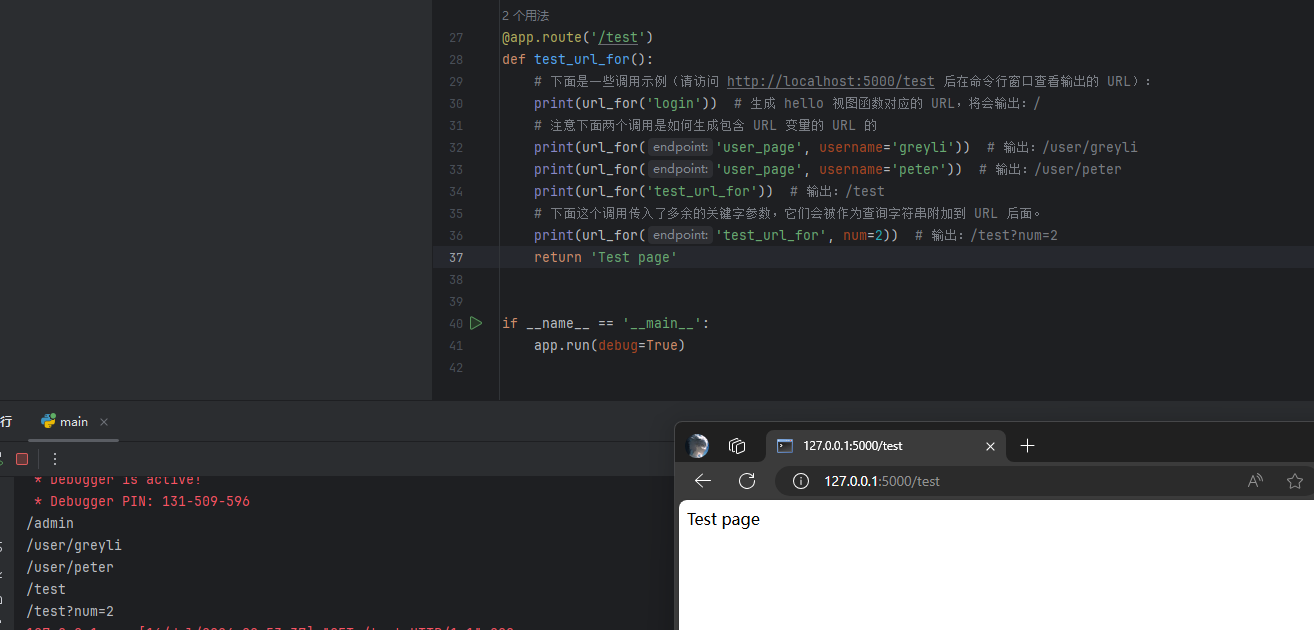
举例
我导入一个html文件,然后返回这个html页面
main.py
import os.path

from flask import Flask

app = Flask(__name__)
html_path = os.path.dirname(__file__) + "\\\\views\\\\"

@app.route('/')
def login():
    return open(html_path+"login.html", "r", encoding="utf-8").read()

if __name__ == '__main__':
    app.run(debug=True)
login.html
  Document

    :root {
      /* COLORS */
      --white: #e9e9e9;
      --gray: #333;
      --blue: #0367a6;
      --lightblue: #008997;

      /* RADII */
      --button-radius: 0.7rem;

      /* SIZES */
      --max-width: 758px;
      --max-height: 420px;

      font-size: 16px;
      font-family: -apple-system, BlinkMacSystemFont, "Segoe UI", Roboto, Oxygen,
        Ubuntu, Cantarell, "Open Sans", "Helvetica Neue", sans-serif;
    }

    body {
      align-items: center;
        /* 决定背景图像的位置是在视口内固定,或者随着包含它的区块滚动。 */
      /* https://developer.mozilla.org/zh-CN/docs/Web/CSS/background-attachment */
        background: var(--white) url("https://res.cloudinary.com/dbhnlktrv/image/upload/v1599997626/background_oeuhe7.jpg") no-repeat fixed center;
        background-size: cover;
      display: grid;
      height: 100vh;
      place-items: center;
    }

    .form__title {
      font-weight: 300;
        margin: 0 0 1.25rem;
    }

    .link {
      color: var(--gray);
      font-size: 0.9rem;
      margin: 1.5rem 0;
      text-decoration: none;
    }

    .container {
      background-color: var(--white);
      border-radius: var(--button-radius);
      box-shadow: 0 0.9rem 1.7rem rgba(0, 0, 0, 0.25),
        0 0.7rem 0.7rem rgba(0, 0, 0, 0.22);
      height: var(--max-height);
      max-width: var(--max-width);
      overflow: hidden;
      position: relative;
      width: 100%;
    }

    .container__form {
      height: 100%;
      position: absolute;
      top: 0;
      transition: all 0.6s ease-in-out;
    }

    .container--signin {
      left: 0;
      width: 50%;
      z-index: 2;
    }

    .container.right-panel-active .container--signin {
      transform: translateX(100%);
    }

    .container--signup {
      left: 0;
      opacity: 0;
      width: 50%;
      z-index: 1;
    }

    .container.right-panel-active .container--signup {
      animation: show 0.6s;
      opacity: 1;
      transform: translateX(100%);
      z-index: 5;
    }

    .container__overlay {
      height: 100%;
      left: 50%;
      overflow: hidden;
      position: absolute;
      top: 0;
      transition: transform 0.6s ease-in-out;
      width: 50%;
      z-index: 100;
    }

    .container.right-panel-active .container__overlay {
      transform: translateX(-100%);
    }

    .overlay {
        background: var(--lightblue) url("https://cdn.pixabay.com/photo/2018/08/14/13/23/ocean-3605547_1280.jpg") no-repeat fixed center;
        background-size: cover;
      height: 100%;
      left: -100%;
      position: relative;
      transform: translateX(0);
      transition: transform 0.6s ease-in-out;
      width: 200%;
    }

    .container.right-panel-active .overlay {
      transform: translateX(50%);
    }

    .overlay__panel {
      align-items: center;
      display: flex;
      flex-direction: column;
      height: 100%;
      justify-content: center;
      position: absolute;
      text-align: center;
      top: 0;
      transform: translateX(0);
      transition: transform 0.6s ease-in-out;
      width: 50%;
    }

    .overlay--left {
      transform: translateX(-20%);
    }

    .container.right-panel-active .overlay--left {
      transform: translateX(0);
    }

    .overlay--right {
      right: 0;
      transform: translateX(0);
    }

    .container.right-panel-active .overlay--right {
      transform: translateX(20%);
    }

    .btn {
      background-color: var(--blue);
      background-image: linear-gradient(90deg, var(--blue) 0%, var(--lightblue) 74%);
      border-radius: 20px;
      border: 1px solid var(--blue);
      color: var(--white);
      cursor: pointer;
      font-size: 0.8rem;
      font-weight: bold;
      letter-spacing: 0.1rem;
      padding: 0.9rem 4rem;
      text-transform: uppercase;
      transition: transform 80ms ease-in;
    }

    .form>.btn {
      margin-top: 1.5rem;
    }

    .btn:active {
      transform: scale(0.95);
    }

    .btn:focus {
      outline: none;
    }

    .form {
      background-color: var(--white);
      display: flex;
      align-items: center;
      justify-content: center;
      flex-direction: column;
      padding: 0 3rem;
      height: 100%;
      text-align: center;
    }

    .input {
      background-color: #fff;
      border: none;
      padding: 0.9rem 0.9rem;
      margin: 0.5rem 0;
      width: 100%;
    }

    @keyframes show {

      0%,
      49.99% {
        opacity: 0;
        z-index: 1;
      }

      50%,
      100% {
        opacity: 1;
        z-index: 5;
      }
    }


## Sign Up


          Sign Up


## Sign In


          [Forgot your password?](#)
        Sign In


          Sign In


          Sign Up


    const signInBtn = document.getElementById("signIn");
    const signUpBtn = document.getElementById("signUp");
    const fistForm = document.getElementById("form1");
    const secondForm = document.getElementById("form2");
    const container = document.querySelector(".container");

    signInBtn.addEventListener("click", () => {
      container.classList.remove("right-panel-active");
    });

    signUpBtn.addEventListener("click", () => {
      container.classList.add("right-panel-active");
    });

    fistForm.addEventListener("submit", (e) => e.preventDefault());
    secondForm.addEventListener("submit", (e) => e.preventDefault());
运行截图
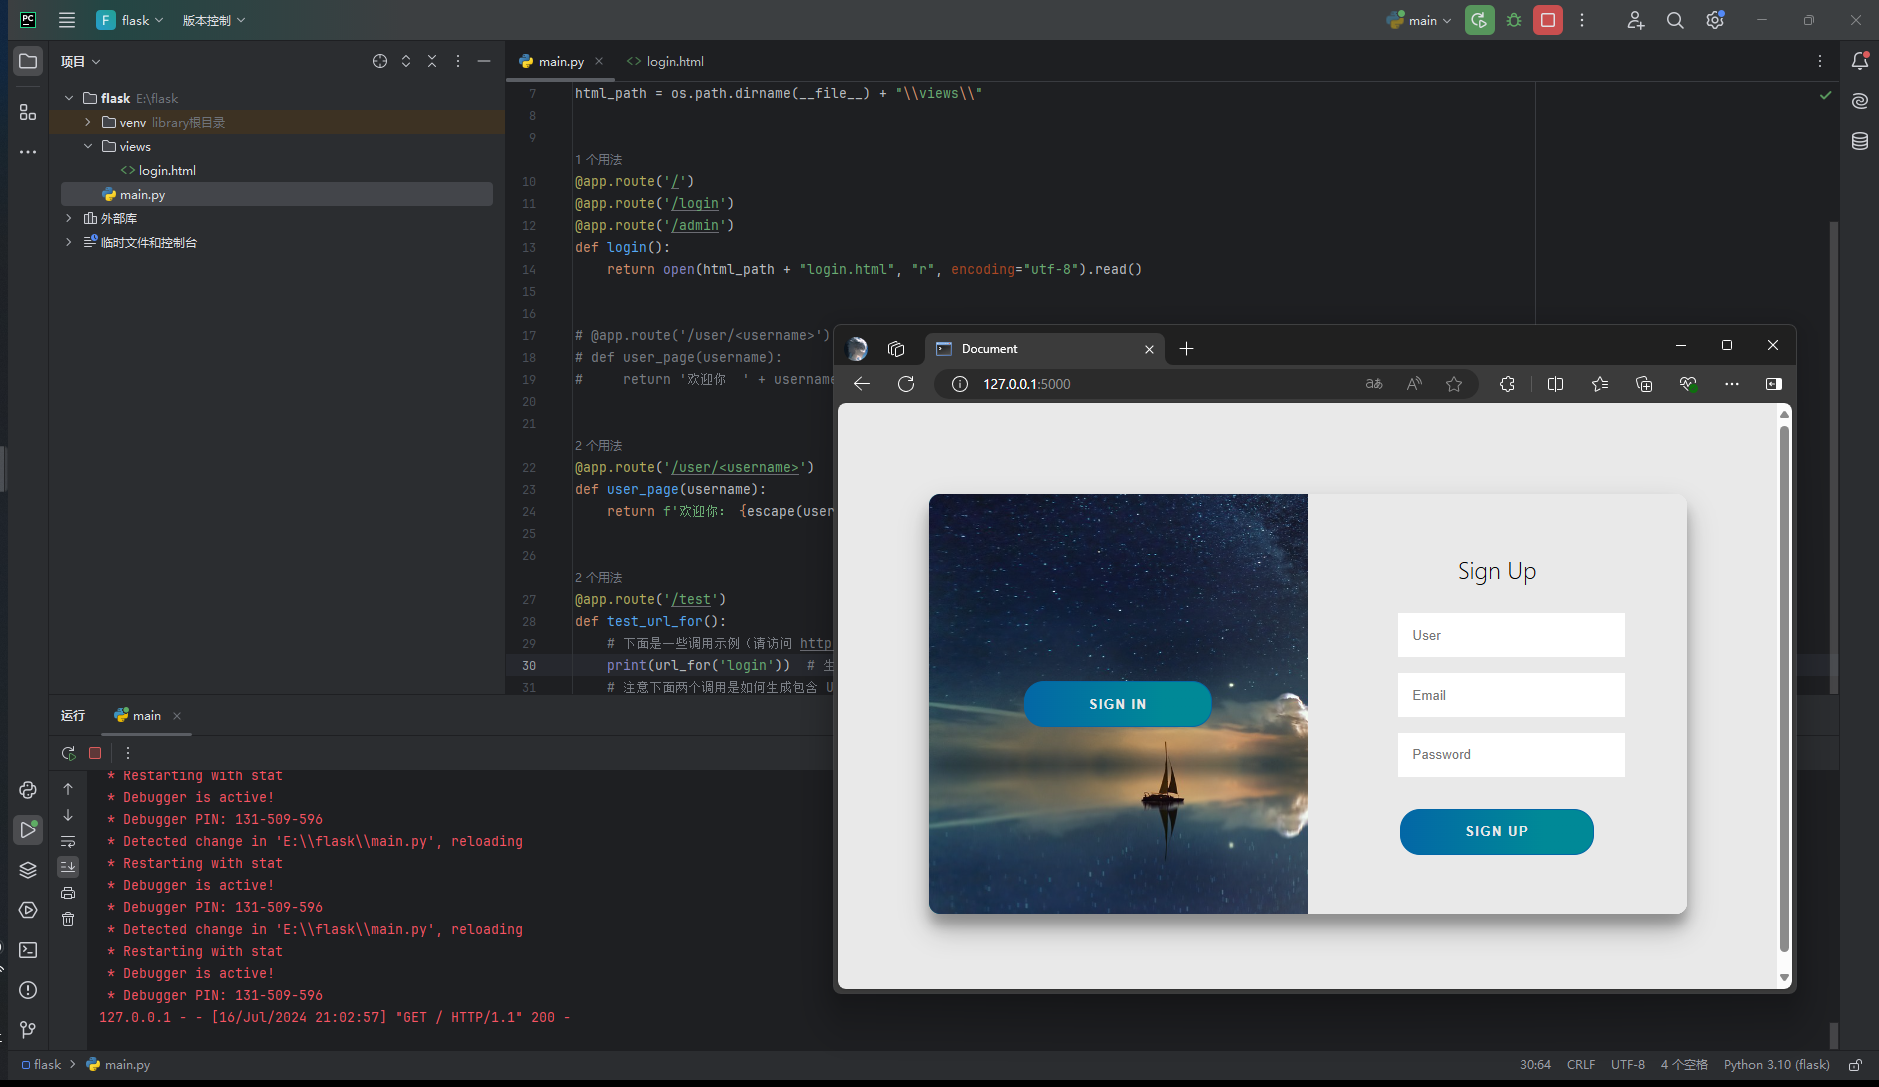
二、HTML模板
在一般的 Web 程序里,访问一个地址通常会返回一个包含各类信息的 HTML 页面。
因为我们的程序是动态的,页面中的某些信息需要根据不同的情况来进行调整,比如对登录和未登录用户显示不同的信息,所以页面需要在用户访问时根据程序逻辑动态生成。
我们把包含变量和运算逻辑的 HTML 或其他格式的文本叫做模板,执行这些变量替换和逻辑计算工作的过程被称为渲染,这个工作我们使用模板渲染引擎——Jinja2 来完成。
通常来讲,会新建一个templates目录来存放模板,static目录存放静态文件。
模板基本语法
# {{ username }}的个人主页

{% if bio %}


{{ bio }}
  {# 这里的缩进只是为了可读性,不是必须的 #}
{% else %}


自我介绍为空。

{% endif %}  {# 大部分 Jinja 语句都需要声明关闭 #}
Jinja2 的语法和 Python 大致相同,你在后面会陆续接触到一些常见的用法。在模板里,你需要添加特定的定界符将 Jinja2 语句和变量标记出来,下面是三种常用的定界符:
-
{{ ... }}用来标记变量。 -
{% ... %}用来标记语句,比如 if 语句,for 语句等。 -
`` 用来写注释。
编写主页模板
我们先在 templates 目录下创建一个 index.html 文件,作为主页模板。主页需要显示电影条目列表和个人信息,代码如下所示:
templates/index.html:主页模板
    {{ name }}'s Watchlist


## {{ name }}'s Watchlist

    {# 使用 length 过滤器获取 movies 变量的长度 #}


{{ movies|length }} Titles


        {% for movie in movies %}  {# 迭代 movies 变量 #}

- {{ movie.title }} - {{ movie.year }}  {# 等同于 movie['title'] #}
        {% endfor %}  {# 使用 endfor 标签结束 for 语句 #}


        © 2018 [HelloFlask](http://helloflask.com/book/3)
为了方便对变量进行处理,Jinja2 提供了一些过滤器,语法形式如下:
{{ 变量|过滤器 }}左侧是变量,右侧是过滤器名。比如,上面的模板里使用 length 过滤器来获取 movies 的长度,类似 Python 里的 len() 函数。
提示 访问 https://jinja.palletsprojects.com/en/3.0.x/templates/#builtin-filters 查看所有可用的过滤器。
准备虚拟数据
为了模拟页面渲染,我们需要先创建一些虚拟数据,用来填充页面内容:
app.py:定义虚拟数据
name = 'Grey Li'
movies = [
    {'title': 'My Neighbor Totoro', 'year': '1988'},
    {'title': 'Dead Poets Society', 'year': '1989'},
    {'title': 'A Perfect World', 'year': '1993'},
    {'title': 'Leon', 'year': '1994'},
    {'title': 'Mahjong', 'year': '1996'},
    {'title': 'Swallowtail Butterfly', 'year': '1996'},
    {'title': 'King of Comedy', 'year': '1999'},
    {'title': 'Devils on the Doorstep', 'year': '1999'},
    {'title': 'WALL-E', 'year': '2008'},
    {'title': 'The Pork of Music', 'year': '2012'},
]
渲染主页模板
使用 render_template() 函数可以把模板渲染出来,必须传入的参数为模板文件名(相对于 templates 根目录的文件路径),这里即 'index.html'。为了让模板正确渲染,我们还要把模板内部使用的变量通过关键字参数传入这个函数,如下所示:
app.py:返回渲染好的模板作为响应
from flask import Flask, render_template

# ...

@app.route('/')
def index():
    return render_template('index.html', name=name, movies=movies)
为了更好的表示这个视图函数的作用,我们把原来的函数名 login 改为 index,意思是“索引”,即主页。
在传入 render_template() 函数的关键字参数中,左边的 movies 是模板中使用的变量名称,右边的 movies 则是该变量指向的实际对象。这里传入模板的 name 是字符串,movies 是列表,但能够在模板里使用的不只这两种 Python 数据结构,你也可以传入元组、字典、函数等。
render_template() 函数在调用时会识别并执行 index.html 里所有的 Jinja2 语句,返回渲染好的模板内容。在返回的页面中,变量会被替换为实际的值(包括定界符),语句(及定界符)则会在执行后被移除(注释也会一并移除)。
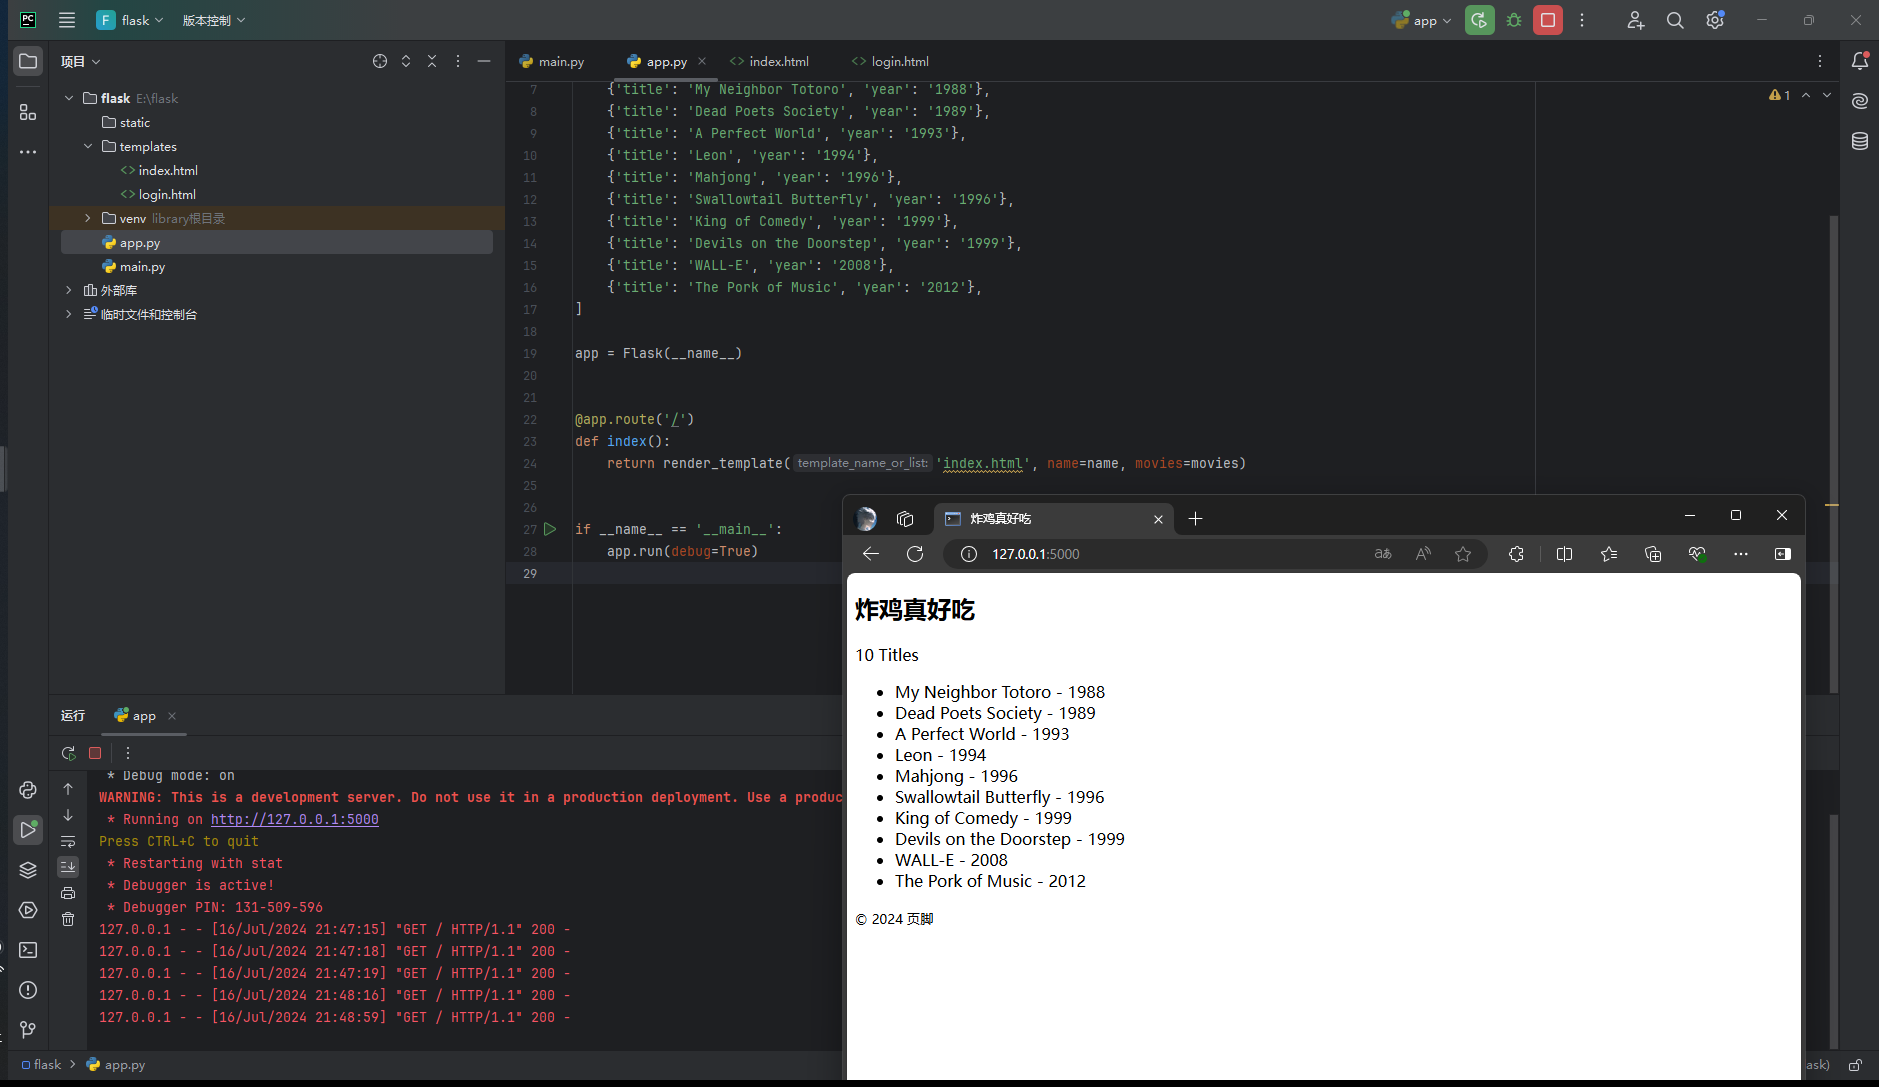
三、静态文件
静态文件(static files)和我们的模板概念相反,指的是内容不需要动态生成的文件。比如图片、CSS 文件和 JavaScript 脚本等。
在 Flask 中,我们需要创建一个 static 文件夹来保存静态文件,它应该和程序模块、templates 文件夹在同一目录层级。
生成静态文件 URL
在 HTML 文件里,引入这些静态文件需要给出资源所在的 URL。为了更加灵活,这些文件的 URL 可以通过 Flask 提供的 url_for() 函数来生成。
举例:
 }})在 Python 脚本里,url_for() 函数需要从 flask 包中导入,而在模板中则可以直接使用,因为 Flask 把一些常用的函数和对象添加到了模板上下文(环境)里。
添加 Favicon
Favicon(favourite icon) 是显示在标签页和书签栏的网站头像。你需要准备一个 ICO、PNG 或 GIF 格式的图片,大小一般为 16×16、32×32、48×48 或 64×64 像素。把这个图片放到 static 目录下,然后像下面这样在 HTML 模板里引入它:
templates/index.html:引入 Favicon
    ...

-
保存后刷新页面,即可在浏览器标签页上看到这个图片。
添加图片
为了让页面不那么单调,我们来添加两个图片:一个是显示在页面标题旁边的头像,另一个是显示在页面底部的龙猫动图。我们在 static 目录下面创建一个子文件夹 images,把这两个图片都放到这个文件夹里:
$ cd static
$ mkdir images
创建子文件夹并不是必须的,这里只是为了更好的组织同类文件。同样的,如果你有多个 CSS 文件,也可以创建一个 css 文件夹来组织他们。下面我们在页面模板中添加这两个图片,注意填写正确的文件路径:
templates/index.html:添加图片
##  }})
{{ name }}'s Watchlist
...
 }})提示 这两张图片你可以自己替换为任意的图片(注意更新文件名),也可以在示例程序的 GitHub 仓库下载。
添加 CSS
虽然添加了图片,但页面还是非常简陋,因为我们还没有添加 CSS 定义。下面在 static 目录下创建一个 CSS 文件 style.css,内容如下:
static/style.css:定义页面样式
/* 页面整体 */
body {
    margin: auto;
    max-width: 580px;
    font-size: 14px;
    font-family: Helvetica, Arial, sans-serif;
}

/* 页脚 */
footer {
    color: #888;
    margin-top: 15px;
    text-align: center;
    padding: 10px;
}

/* 头像 */
.avatar {
    width: 40px;
}

/* 电影列表 */
.movie-list {
    list-style-type: none;
    padding: 0;
    margin-bottom: 10px;
    box-shadow: 0 2px 5px 0 rgba(0, 0, 0, 0.16), 0 2px 10px 0 rgba(0, 0, 0, 0.12);
}

.movie-list li {
    padding: 12px 24px;
    border-bottom: 1px solid #ddd;
}

.movie-list li:last-child {
    border-bottom:none;
}

.movie-list li:hover {
    background-color: #f8f9fa;
}

/* 龙猫图片 */
.totoro {
    display: block;
    margin: 0 auto;
    height: 100px;
}
接着在页面的 `` 标签内引入这个 CSS 文件:
templates/index.html:引入 CSS 文件
...
提示 当你把 CSS 写到单独的文件后,浏览器获取到这个文件后会对其进行缓存(其他静态文件同理,比如 JavaScript 文件)。Flask 从 2.0 版本开始支持自动重载静态文件的变化,如果你使用的仍然是旧版本的 Flask,那么每当你对 CSS 文件的内容进行更新后,都需要使用下面的快捷键清除缓存:
Google Chrome(Mac):Command + Shift + R
-
Google Chrome(Windows & Linux):Ctrl + F5
-
Firefox(Mac):Command + Shift + R
-
Firefox(Windows & Linux):Ctrl + F5
-
Safari:Command + Option + R
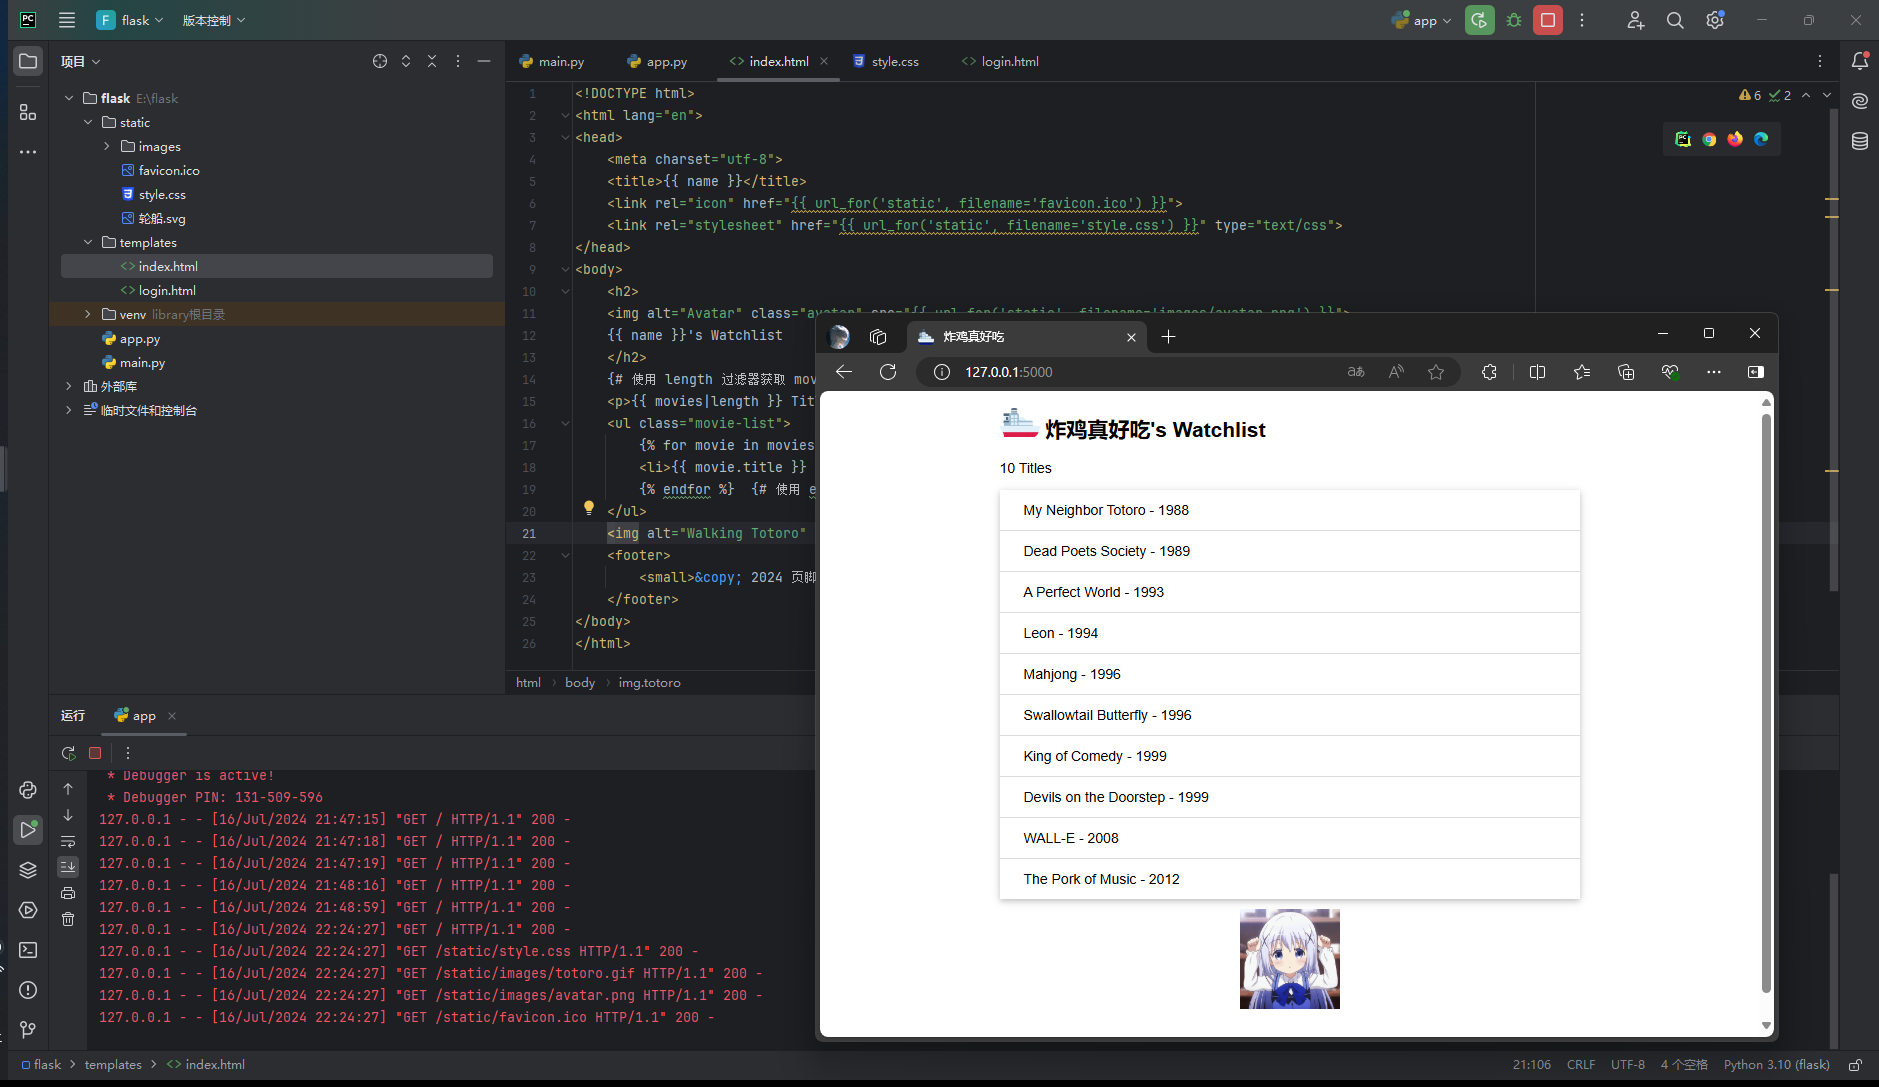
最后要为对应的元素设置 class 属性值,以便和对应的 CSS 定义关联起来:
templates/index.html:添加 class 属性
##  }})
{{ name }}'s Watchlist
...
...
 }})
| — | — |
四、数据库
使用 SQLAlchemy 操作数据库
为了简化数据库操作,我们将使用 SQLAlchemy——一个 Python 数据库工具(ORM,即对象关系映射)。借助 SQLAlchemy,你可以通过定义 Python 类来表示数据库里的一张表(类属性表示表中的字段 / 列),通过对这个类进行各种操作来代替写 SQL 语句。这个类我们称之为模型类,类中的属性我们将称之为字段。
Flask 有大量的第三方扩展,这些扩展可以简化和第三方库的集成工作。我们下面将使用一个叫做 Flask-SQLAlchemy 的扩展来集成 SQLAlchemy。
但是我的开发更喜欢用MySQL数据库或者SqlServer,这里不对这个数据库进行过多介绍。
使用MySQL数据库
在python中,可以使用pymysql库进行数据库操作
# 安装pymysql
pip install pymysql
在mysql数据库中新建
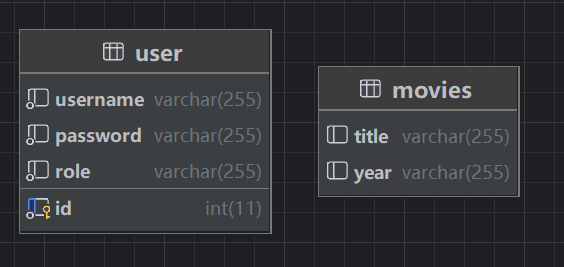
编写一个mysql配置类
import pymysql
from pymysql import cursors
class DbConfig:
    def __init__(self):
        self.conn = pymysql.connect(
            host='127.0.0.1',  # 主机名(或IP地址)
            port=3306,  # 端口号,默认为3306
            user='root',  # 用户名
            password='123456',  # 密码
            charset='utf8mb4',  # 设置字符编码
            autocommit=True,  # 自动提交更改
            database='flask_study',  # 数据库名称
            cursorclass=cursors.DictCursor  # 转换成字典格式输出
        )
        self.cursor = self.conn.cursor()

    def findUser(self):
        self.cursor.execute('select * from user where id=1')
        users = self.cursor.fetchall()
        return users

    def findMovies(self):
        self.cursor.execute('select * from movies')
        movies = self.cursor.fetchall()
        return movies

    def __del__(self):
        self.cursor.close()
        self.conn.close()
在使用数据的时候可以像下面这样写
name = DbConfig().findUser()[0]['username']
movies = DbConfig().findMovies()
完整的代码:
import pymysql
from flask import Flask, render_template
from pymysql import cursors

class DbConfig:
    def __init__(self):
        self.conn = pymysql.connect(
            host='127.0.0.1',  # 主机名(或IP地址)
            port=3306,  # 端口号,默认为3306
            user='root',  # 用户名
            password='123456',  # 密码
            charset='utf8mb4',  # 设置字符编码
            autocommit=True,  # 自动提交更改
            database='flask_study',  # 数据库名称
            cursorclass=cursors.DictCursor  # 转换成字典格式输出
        )
        self.cursor = self.conn.cursor()

    def findUser(self):
        self.cursor.execute('select * from user where id=1')
        users = self.cursor.fetchall()
        return users

    def findMovies(self):
        self.cursor.execute('select * from movies')
        movies = self.cursor.fetchall()
        return movies

    def __del__(self):
        self.cursor.close()
        self.conn.close()

app = Flask(__name__)

@app.route('/')
def index():
    name = DbConfig().findUser()[0]['username']
    movies = DbConfig().findMovies()
    return render_template('index.html', name=name, movies=movies)

if __name__ == '__main__':
    app.run(debug=True)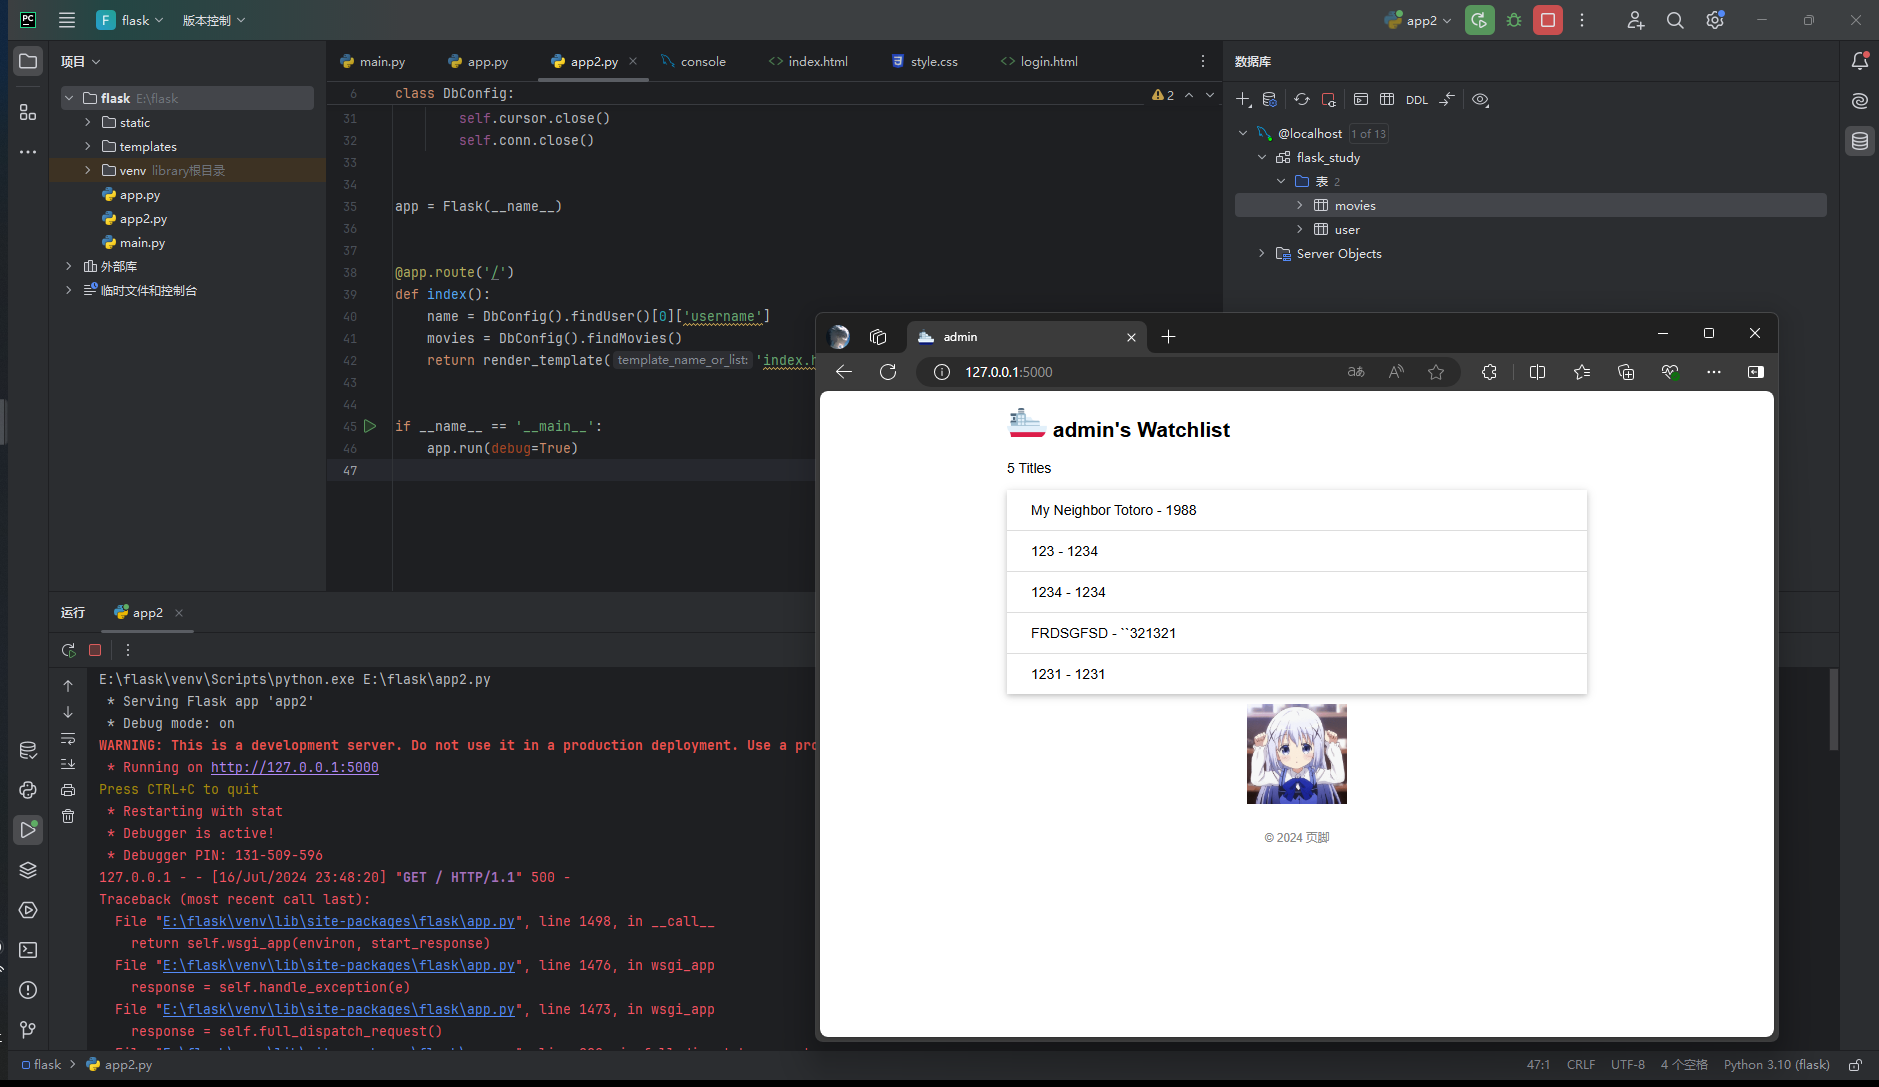
大体上就是这个样子了
这种开发满足了基本需求,开发周期短,但是想要好看的页面,可以使用json数据做一个前后端分离或者整合的项目。
本文由 lggyx 原创,首发于lggyx.github.io。
采用 CC BY-NC-SA 4.0许可协议:转载请注明出处,非商业使用,相同方式共享。